Tuesday, August 29, 2017

33,000 Telnet Credentials Leak Analysis


Last week 33000+ Internet of Things devices were posted on pastebin with their IP addresses and telnet credentials. I downloaded the leak to analyze and found some interesting things. I confirmed the leaked credentials by logging into some of the systems. The original leak has since been removed from pastebin.

In this post, I will look over the following three things:

  • Introduction to Telnet protocol
  • Physical location of the IP address (with a nice world map)
  • Frequency of the usernames/passwords that were used to log-in

What is Telnet?

Telnet allows for remote connection to a computer over port 23 and opens up a command-line interface. The telnet protocol is inherently insecure because it lacks authentication and encryption. To log-in to a computer using telnet you must provide a username and password (if this setting is on, default uses no authentication). The authentication for telnet is transferred in plain-text and can be sniffed by an attacker for re-use. The communication line when you open up a telnet connection is also in plain-text so your activity can be observed by a third-party.

Telnet has largely been replaced today by Secure Shell (SSH) which solve the security issues. Oddly enough, many Internet of Things devices still use telnet for remote administration. This is what we will be observing today.

Where in the World Are These Devices?

The original leak looked like this:

With the help of 'cut' I was able to strip the port number and credentials for a list of strictly IPs. I piped that output into 'sort' and 'uniq' to display only unique IPs. The result was 1738 unique IPs, significantly less than advertised in the leak.


I ran these IPs through an open-sourced tool: PyGeoIpMap. This Python script queries the freegeoip.net API to find out the state, coutnry, longitude and latitude of an IP address. It generates a map of the IPs as an output.


I made changes to the script to output a list of the corresponding countries with each IP. With 'sort' and 'uniq' I was able to see the different countries and frequencies with which they occurred.

We see that most of these devices are in China, India and Brazil. It makes sense that China and India would have a larger number of devices due to their large population, however, Brazil seems to have an oddly large number in this leak.

Most Used Usernames and Passwords

Using 'sed' I parsed the original list for unique usernames and passwords. Here are my findings.

Below is a list of all the usernames paired with their frequency.

Below is a list of all the passwords paired with their frequency.

We see that the #1 most common user:pass is admin:admin. Just another reminder to always change the default credentials on any devices that touches the Internet *cough* your home router *cough*

Conclusion

  1. Don't connect devices to the public internet unless absolutely needed.
  2. Don't use legacy protocols like Telnet, they are inherently insecure and there is a reason SSH exists.
  3. Don't forget to change the default credentials on all your devices.
  4. China and India have big populations.

Special thanks to pierrrrrrre for writing PyGeoIpMap which I used to create the map.

Friday, June 30, 2017

Encrypting messages with an XOR cipher

In this post, I will go through the logical XOR operation, show how it can be used to encrypt/decrypt strings and then introduce a python script that automates this process.


XOR


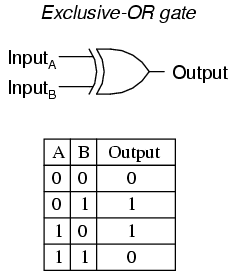
XOR (Exclusive or) is a logical operation. It outputs 'true' when exactly one of the inputs is 'true'. Here's a truth table of XOR where 0's are 'false' and 1's are 'true'.


Using XOR to Encrypt/Decrypt Strings


Encryption

I have a string "hello", this will be the plaintext message which I want to encrypt, which is represented as follows in binary:

"01101000 01100101 01101100 01101100 01101111"

 Each 0 or 1 is a bit and 8 bits create a byte. Each byte represents one letter in "hello".

I have a second string "world", this will be the key to encrypt/decrypt my plaintext message, which is represented as follows in binary:

"01110111 01101111 01110010 01101100 01100100"

Again, each letter in "world" is represented by a byte or 8 bits.

Referring to the above image, "hello" will be InputA and "world" will be InputB. We will now compute the output using XOR.
  
01101000 01100101 01101100 01101100 01101111 (hello) (our plaintext)
01110111 01101111 01110010 01101100 01100100 (world) (our key)

Here's the first byte encrypted in detail, you can do the rest on your own.

01101000 (first byte of our plaintext)
01110111 (first byte of our key)

0 XOR 0 = 0
1 XOR 1 = 0
1 XOR 1 = 0
0 XOR 1 = 1
1 XOR 0 = 1
0 XOR 1 = 1
0 XOR 1 = 1
0 XOR 1 = 1

The first byte of our encrypted message is 00011111 as shown below. Repeat this for the rest of the bytes to obtain the output shown below.

00011111 00001010 00011110 00000000 00001011 (non-readable ASCII characters)

The output in binary is composed of characters that cannot be represented as normal letters or numbers. They are control characters that the computer understands to perform various operations.

So what have we done here? We've taken a plaintext string, "hello", XORed it with a key string "world" and obtained a non-readable output. This is not always the case, there are times where the output will have characters from the alphabet and numbers. The output of this XOR operation is called our ciphertext. In cryptography, ciphertext is a fancy way of saying encrypted plaintext message.

Great! Now we can send this binary message to someone, but how will they extract our plaintext from it?

Decryption


00011111 00001010 00011110 00000000 00001011 (non-readable ASCII characters)
01110111 01101111 01110010 01101100 01100100 (world) (shared key)

If someone received this message in binary and knew the key, they could XOR the cipher text with the key and obtain the original message. Let's go through it.

Here's the first byte decrypted in detail, you can do the rest on your own.

00011111 (First byte of our cipher text)
01110111 (First byte of our key)

0 XOR 0 = 0
0 XOR 1 = 1
0 XOR 1 = 1
1 XOR 1 = 0
1 XOR 0 = 1
1 XOR 1 = 0
1 XOR 1 = 0
1 XOR 1 = 0

The first byte is 01101000 which matches our original message and is of course, the character 'h'.

Repeat this for the rest of the bytes and you will obtain the original message 'hello'.

01101000 01100101 01101100 01101100 01101111 (hello) (our plaintext)

We can now send encrypted messages and the recipient can decrypt them. Secure communication! Not really, for your message to be secure from any snoopers, your key must be completely random and unpredictable.


Securing Messages with XOR alone

- Your key must be longer than your plain text message
- Your key must be TRULY random (no bashing on your keyboard doesn't count)
- The random key you use is a One-Time pad, it must be discarded and never used again so that people cannot use the key to decrypt future messages
- The key must be communicated to the recipient over a secure line (or in person)

As you can see, XOR alone is not a good method for truly secure communication because it is a linear operation (a given input always has the same output). However, it is still useful in cryptography because the XOR operation can be performed quickly to encrypt messages in a stream (as the data is created it cant be encrypted and sent off).

Automating the Process

xor_encrypt_master.py

The script will prompt you whether you want to encrypt or decrypt.

If you select encrypt, it will ask you for a plain text message and a key. Once you enter these, it will ask you the name of the *.pickle file you want to save your message in.

If you select decrypt, it will ask for the name of the *.pickle file you want to encrypt and then the key. It will then output the plain text message using the key. Note, if the key you used is incorrect it will still attempt to output the plain text message (but it will obviously be wrong).


encrypt
 

decrypt


The latest copy of my code will be kept here: https://github.com/justinbui/XORcipher


Concluding Remarks


I wrote this for educational purposes to get a better idea of how the XOR cipher works and practice Python. I hope you learned something from reading! I'm not liable for anything you do with the information presented.

Wednesday, February 22, 2017

Scanning The Entire Internet: Unauthenticated VNC Servers

Want to scan the whole Internet and see what people are doing? Look no further, today I present a post on Virtual Network Computing (VNC) and how many people in the world set-up VNC servers with no authentication. I will cover VNC, scanning the internet, the RFB protocol, a python script to take screenshots and interesting finds (the best for last) :-)


Virtual Network Computing (VNC)

Virtual Network Computing (VNC) is a software that once installed on a user's computer allows remote access to this computer from anywhere in the world. A user connecting to a VNC server is able to move the mouse, click and type as if the user was sitting in front of the computer. VNC uses the Remote Frame Buffer (RFB) protocol and by default listens on port 5900.

Being able to access a home/work computer remotely has many benefits such as accessing files/data and being able to remotely work anywhere at any time. However, the security aspect of VNC must be taken into account or malicious actors will also be able to remotely access and control your computer.

VNC servers can be set-up with a password to discourage attackers. Nevertheless, human error is unavoidable and there are people who set up their computers as VNC servers without the need for any form of authentication. This article will go into exploiting human error, accessing and documenting VNC servers that do not require authentication.

Scanning the Internet

This was done using the open-source tool masscan created by Robert David Graham. I used masscan to scan all IPv4 addresses on the internet and create a list of IPs that had port 5900 open. DO NOT SCAN FROM YOUR HOUSE, your ISP will catch the massive amount of packets you are sending to the internet and shut you down. You can try to scan from a virtual private server (VPS) that you can rent for a small fee. The terms of use for a VPS generally say no internet scanning as well, but you can get away with it. Masscan gives you an estimated time of scan completion, just be quick and pull your scan results offline as soon as your scan completes (or better as you scan, pull down IPs) before your VPS shuts you down.

I won't disclose how I obtained my list, but my completed scan resulted in 3.4 million IP addresses with port 5900 open and took about 10 hours.


Here's how some people reacted to being scanned (they didn't like it).


pwnVNC

The script begins by prompting for user input for the location of their IP list. The function get_security(TCP_IP) takes an IP address, connects to port 5900 over TCP/IP, negotiates the version/security handshake and sets a flag if unauthenticated access is possible. If this flag is set, vncsnapshot is invoked in the main section of the script. The script repeats until all IPs in the list with no password have been documented with screenshots.

The latest copy of my code can be found here: https://github.com/justinbui/pwnVNC

Remote Frame Buffer (RFB) protocol

To truly understand pwnVNC.py, you have to understand how the RFB protocol performs the version handshake and the security handshake. Full documentation on the RFB protocol can be found here.

Protocol Version Handshake

To connect to a VNC, the client (your computer) makes a connection to the VNC server over port 5900. When this TCP connection is made, the server responds with it's RFB protocol version. This is returned of 12 bytes which can be read as a string of ASCII characters. The protocol version is in the form: 'RFB XXX.YYY\n' with '\n' being interpreted as a new line character. The client must then respond with it's RFB protocol version capabilities. In the case of pwnVNC.py, we send back the version that we receive to the server which completes the protocol version handshake.


Security Handshake

Once the client and server have agreed on a protocol version, the server sends a single byte that represents the number of authentication methods that are possible to connect to this VNC server. For each method of authentication, the server sends a byte that represents the security types it can handle. In our case, we are looking for no authentication which is represented by security type '1' or 0x00000001 bits. When security type '1' is found we set our snapshot_flag to True.


The red box shows what our script looks for before attempting to run vncsnapshot.

Interesting Finds

I found many different operating system ranging from Windows to Linux to OSX. There were many windows/linux servers, people watching TV shows and even a mobile device/tablet. Unfortunately, there were also many industrial control systems (ICS), programmable logic controllers (PLC) and supervisory control and data acquisition systems (SCADA). I even found a server dealing with a bank's internal network.


Concluding Remarks

This analysis has been done before at Def Con 22 and by other people as well. I wanted to write my own method of automation as a learning exercise.

This was done for informational/educational purposes only. I did not, at any point in time, attempt to break into a system that had authentication. The program does not do anything malicious to the VNC servers it found without authentication. If you want an image taken down, please email me and I will remove it immediately.

I hope you learned something from this article whether it was some socket programming in python, the concept of VNC or details on the RFB protocol. Thanks for reading!

I will keep my code updated and it can be found here: https://github.com/justinbui/pwnVNC

Below are my references and tools that made all this possible. Big thank you to everyone who helped develop these open-source tools!
Github: masscan
Github: vncsnapshot
Documentation on RFB Protocol
https://0wned.it/2014/08/28/open-curtains-vnc-with-no-authentication/ (previously done VNC scan by 0wned using perl and nmap)
Massscanning the Internet: Defcon 22
Scan the Internet & Screenshot All the Things